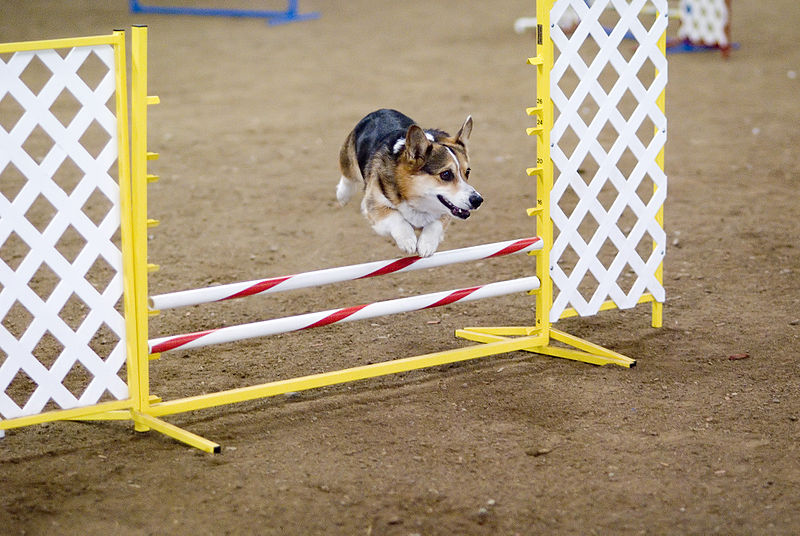
Create an agility course for your dog to keep him fit and entertained. Agility is a fun way to bond with your pet and gives your dog a chance to exercise some of his natural instincts. You don’t need to spend a fortune to create a good quality agility course in your own back yard. Follow our DIY dog agility frame guide and you and your dog will be getting fit and having fun in no time!
These instructions are intended for adults and should not be attempted without first consulting a professional. Always wear appropriate safety gear.
Dog agility jump
- Purchase 3 PVC pipes (one should be 0.5 metres, two should be the height of your dog) and two PVC pipe corner connectors. These should be available at your local home improvement store. You can paint the pipes fun colours!
- Insert two PVC pipes into the ground 0.5 metres apart. The top of the pipes should be about as tall as the top of your dog’s head.
- Place a corner PVC pipe connector on the tops of both PVC pipes you inserted into the ground. The open end of the connector should be pointed inwards toward the other pipe connector.
- Place a two-foot length of PVC pipe into the open ends of the pipe connectors to make a jump for your dog.

Dog agility weave poles
- Purchase 6 PVC pipes at least 0.5 meters longer than your dog is tall.
- Insert first PVC pole in the ground. Place the second PVC pole in the ground 60 cm from the first pole.
- Insert the third PVC pole 60 cm from the second pole ensuring that your poles form a straight line.
- Repeat with fourth, fifth, sixth poles.
- Once your dog masters waving through six poles you can up it to twelve!

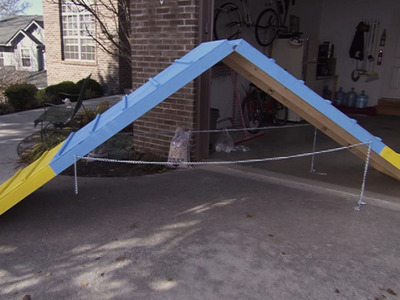
Dog agility A-frame
You will be creating two identical frames and attaching them.
Ensure you have the proper training before using any tools below, always take the proper safety precautions and wear proper safety gear. Consult an expert before you begin construction.
- Use a saw to cut two sheets of plywood down to 1m x 2.5m. One piece of plywood will be used for each side of the A-frame.
- To make the plywood pieces rigid, attach 90mm x 35mm structural timber around the perimeter and one length wise down the middle of each piece. Attach the structural timber with a pneumatic nail gun through the face of the plywood. You’ll do this twice, once per side.
- Add wooden rungs to the plywood to aid your dog’s traction as he climbs the A-frame. Starting from the bottom, mark lines every 30 cm across the width of the plywood. Cut 90 mm x 25 mm structural timber (alternatively you can use moulding) in lengths of 90 cm for each rung. Centre each rung horizontally along your lines, you should have a 5 cm reveal on each side of the rung. Attach the rungs with wood glue and 35 mm (approx.) galvanized nails. You’ll do this twice, once per side.
- Paint the A-frame using exterior house paint that has been mixed with sand for increased traction. It is a good idea to use two different colours of paint on each side of so your dog can get a clear sense of the obstacle. Use two coats and wait until paint is fully dry before continuing.
- Place the two frames back to back (with the plywood sides facing outwards). Use 7.5 cm hinges to attach the two sides of the A-frame along one of the short sides.
- Attach eye-rings about midway down on each side of the wall (on the structural timber). Attach a chain through the eye-rings so you can adjust the height of the wall.

This is not a regulation size agility frame and is intended for recreational use only.
Speak to your veterinarian to be sure this equipment is suitable for your pet. Please consult a professional before beginning construction and always use the recommended safety equipment. Have a professional check, the structural integrity of the agility equipment before use. Never leave your pet unsupervised while using agility equipment.
This blog was written by the furry family at Petcover Australia. Petcover Pet Insurance specialises in animal and animal industry insurance. Our practices keep the role that pet insurance plays in responsible pet ownership and the health of the pet at the forefront.


